Appearance
User Store
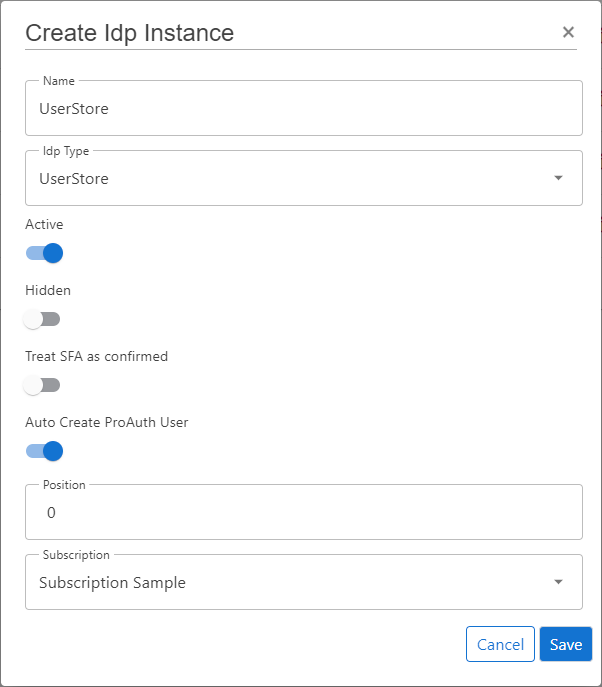
Create new IDP
Steps to create a new IDP:
- Navigate to the ProAuth Admin UI and login with a user assigned to role
SubscriptionAdminor higher - Navigate to
Idp Instancesand click onCreate Idp Instance - Choose the IDP Type
UserStore - Enable the flag
Active - Enable the flag
Auto Create ProAuth User - Choose the proper Subscription
- Click
Save
Configure new IDP
After the creation of the IDP in the step before, it's now necessary to configure the IDP. Invalid IPDs aren't available in ProAuth.
It's necessary to already have an existing and deployed UserStore database. The connection string with Read/Write permissions to this database is one of the mandatory options.
Steps to complete the configuration of the IDP:
- Open the IDP in the extended edit view
- Assign the IDP to the required Tenants
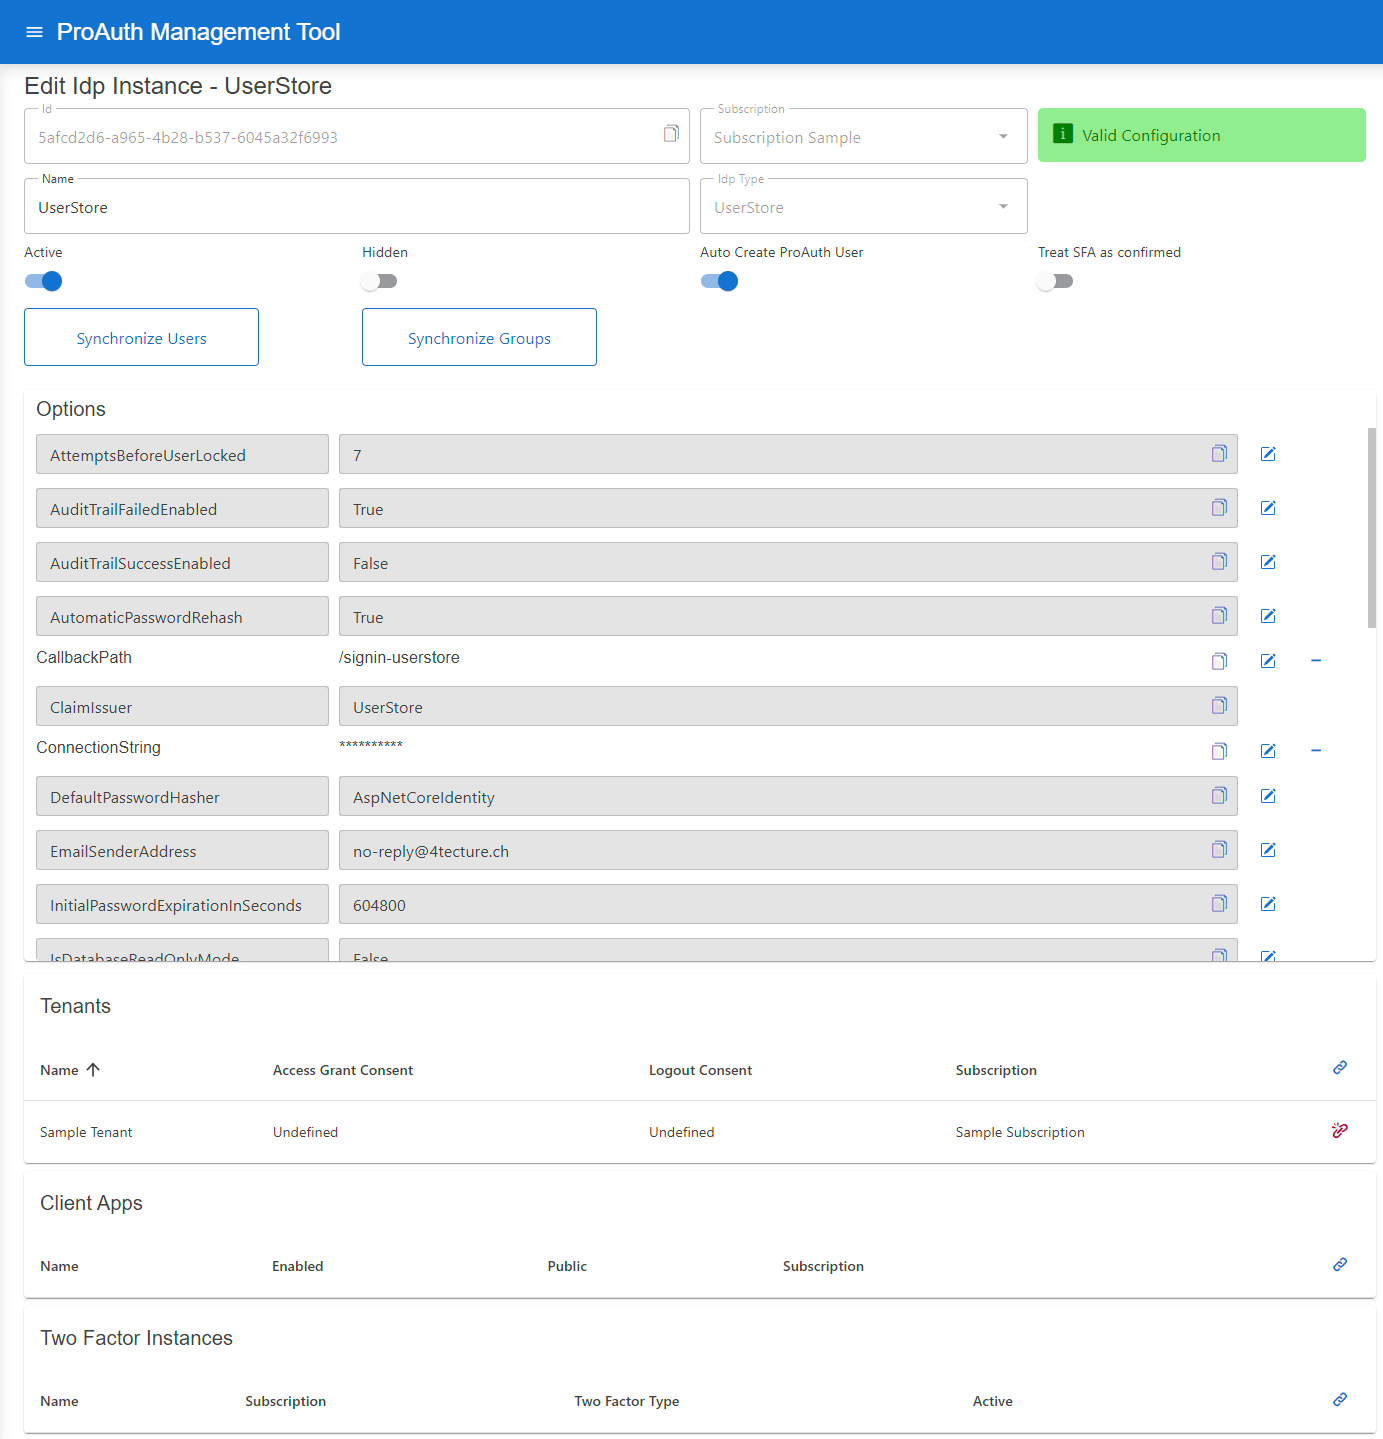
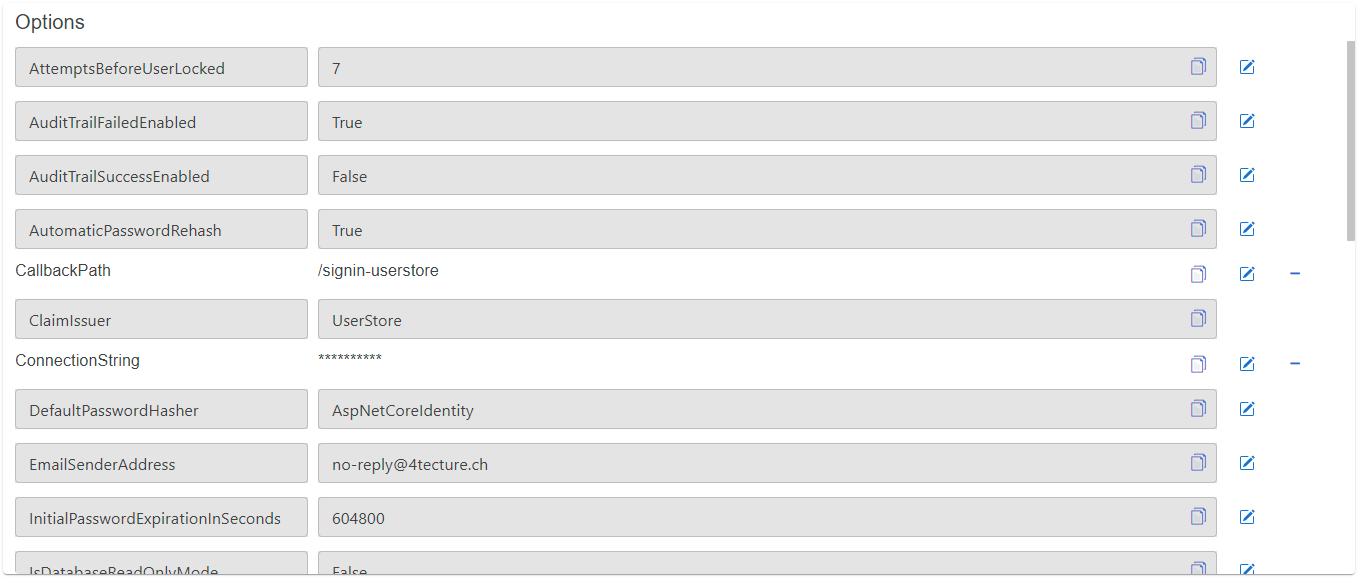
Configure mandatory Options:
- Set the
ConnectionStringfor the SQL database - Set the
CallbackPath(e.g./signin-userstore) - Set the
ClaimIssuer(default:UserStore) - Set the
HashAlgorithmName(default:System.Security.Cryptography.SHA256) - Set the
IsDatabaseReadOnlyMode(default:false)
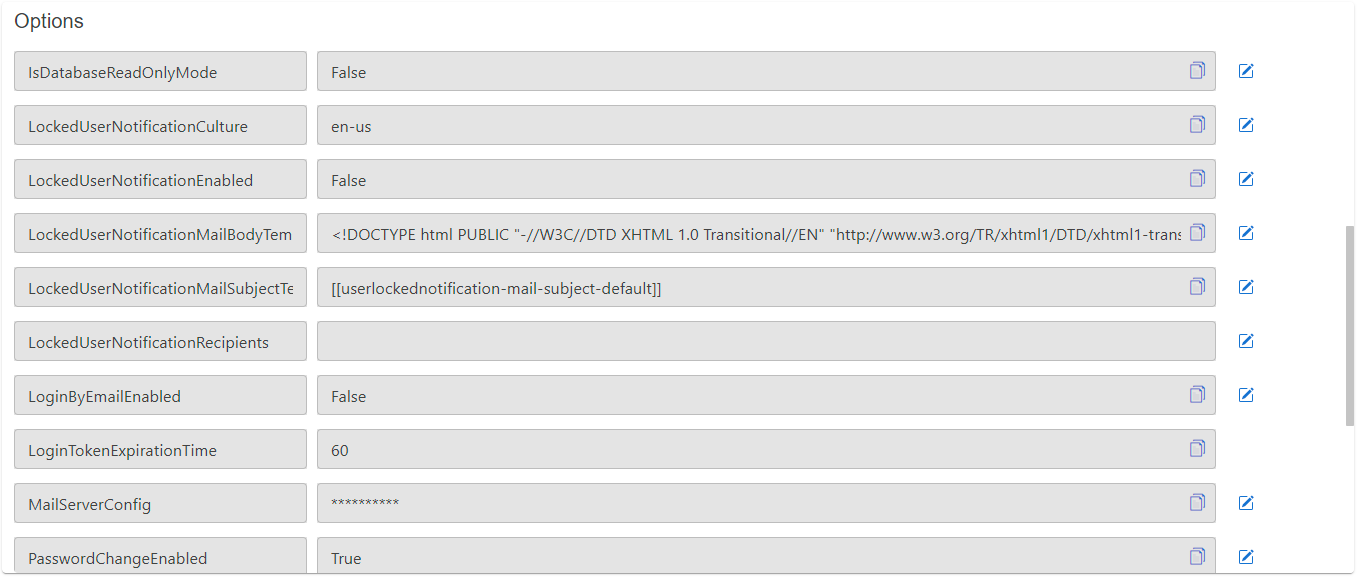
Enable UserStore login by email address:
The UserStore identifies its users by their unique username. The user entry also contains an e-mail field which is primarily used for notifications. People are used to login by their e-mail address. There are two possibilities to achieve that behavior. Either the username is set to the users e-mail or you can enable to UserStore to accept logins by the username or the e-mail address. The latter option only works, if the e-mail addresses are unique across all users in the same user store. To enable login by e-mail, please set the following options:
Set the
LoginByEmailEnabledoption totrue
INFO
The user input (username or e-mail) is always checked against the username first. If no username is found and this option is enabled, the e-mail address is used to identify the user. This order is necessary because e-mail addresses can also be used as usernames in the user store.
If more than one user is found due to the email address (two or more users have entered the same email address) an error message is displayed (username/email or password wrong). We treat this case as if the e-mail address does not exist. For these users a login via username is mandatory. For security reasons, only a general error message is returned.
The password reset works similar to the login: If the option is enabled, the password reset can be requested via the e-mail address. If the e-mail address is used more than once, the password reset must be requested via the username.
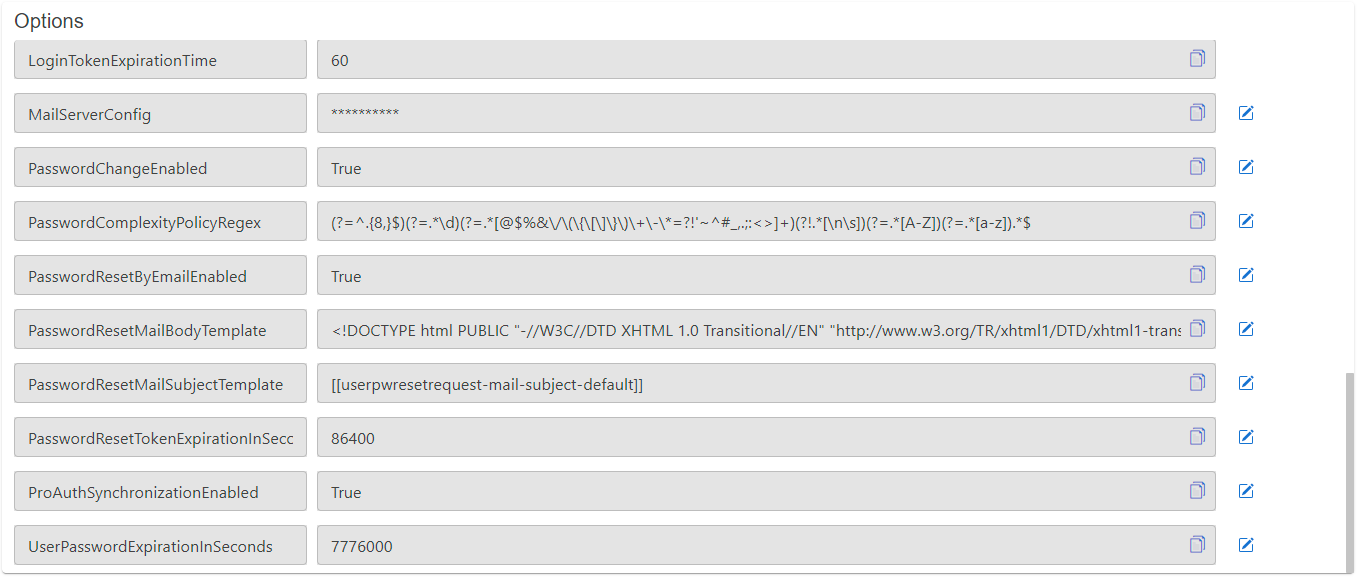
Configure mail setting Options
- Set the
EMailSenderAddress - Set the
MailServerConfig


MailServerConfiguration sample data for SMTP Server:
json
{
    "MailType": "SMTP",
    "Host": "<smtp-host-address>",
    "Port": 465,
    "EnableSSL": true,
    "UserName": "<smtp-username>",
    "Password": "<smtp-password>",
    "Timeout": 20000
}
MailServerConfiguration sample data for Microsoft365:
json
{
"MailType": "M365",
"ClientId": "<aad-app-clientid>",
"ClientSecret": "<aad-app-clientsecret>",
"TenantId": "<aad-app-tenantid>",
"UserId": "<aad-user-objectid>"
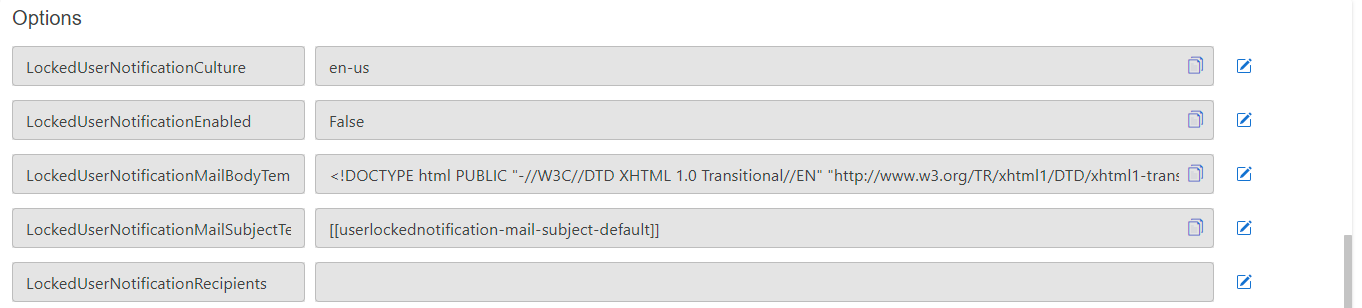
}User lock notifications Options
An email notification can be enabled to inform administrators about locked users (due to too many wrong login attempts).
- Enable notification by the option
LockedUserNotificationEnabled - Configure the recipients by adding a semicolon separated list of e-mail addresses in the option
LockedUserNotificationRecipients
The subject and the content of the e-mail message can be customized. The following options are used for this:
LockedUserNotificationMailSubjectTemplate: Contains the reference for a label used as the e-mail subjectLockedUserNotificationCulture: This defines the culture which is used to translate the labels (The culture name in the format languagecode2-country/regioncode2)
The following syntax is used within templates or options:
- Labels: In the form of
[[labelname]] - Placeholders for data values: In the form of
. Each template has a fixed set of placeholders.
The values of the labels can be modified by overwriting the label values in the label management of ProAuth.
Configure Password Hashing Algorithm
ProAuth provides a modular password hashing functionality for its UserStore which means that different hashing algorithms can be used side-by-side. Password hashes can be migrated to other algorithms upon a user login. Besides our standard algorithms, custom algorithms can be developed to ease the migration of UserStores from other systems.
We currently support 3 algorithms:
- AspNetCoreIdentity V2
- AspNetCoreIdentity V3
- ProAuthPasswordHasher V1
Each UserStore defines a default hasher which is used for newly created users or to upgrade existing hashes during a login. Our current system default is AspNETCoreIdentity V3. The two other algorithms indicate a "rehash needed" flag which triggers the password hash migration to the default algorithm if configured accordingly.
Password Hashing Algorithm Options
DefaultPasswordHasherWith this option the default password hash algorithm can be defined. By default, the most current one is always configured.

Possible password hashers:
ProAuthPasswordHasherProAuthPasswordHasherV1
AspNetCoreIdentityAspNetCoreIdentityV2AspNetCoreIdentityV3
For the password hasher a generic hasher (e.g.
AspNetCoreIdentity) can be chosen as well as an explicit hasher (e.g.AspNetCoreIdentityV3). With a generic hasher, the latest version of this hasher is always used.AutomaticPasswordRehash
This option defines whether a password hash that should be rehashed is automatically rehashed the next time it is used
UserStore to ProAuth synchronization (implicit SCIM synchronization)
By default, UserStore groups and users are synchronized with ProAuth users and groups (one-way only). All possible properties of groups and users are synchronized. For users, all profiles are also synchronized, for groups all metadata as well. The synchronized ProAuth groups and users are read-only, they cannot be edited. It is only possible to define ProAuth Roles or TwoFactor settings on synchronized objects.
UserStore to ProAuth synchronization can be configured via the UserStore option: ProAuthSynchronizationEnabled.

UserStore AuditTrail
By default, failed login attempts are audited in UserStore. Optionally, all successful logins to ProAuth can also be audited.
The auditing of logins can be controlled by following UserStore options:

User Store DB Deployment Worker
ProAuth provides a worker container which is able to automatically create and configure databases for newly created UserStore IDP instances. To deploy and run the DB deployment worker container, please enable it in the Helm values and configure the appropriate settings corresponding to your setup.
The DB deployment worker listens for ProAuth UserStore changed events. Either a change on an active UserStore IDP with a configured ConnectionString or the change of the ConnectionString itself triggers the worker to create the potentially missing database.
If a change event is received, the DB deployment worker performs the following steps:
- Identify the database type based on the connection string information (Azure SQL or SQL Server)
- Create the database if it does not already exist.
- Add the SQL users if they do not already exist.
- Apply the security roles to the users
User Store Password Change
The password of a user can be changed by the user as follows:
- During the login process, the user can choose to change the password which is then changed withing the login process.
- The client application may provide a password change link which takes the user to the password change page and routes him back to the application or shows a confirmation page.
- By choosing "forgot password" on the login page. The user will then receive a password reset link via e-mail if there is a validated e-mail address associated to the user.
An administrator is also able to perform the following password change operations through the admin UI:
- Send a password reset e-mail to the user
- Set a new initial password and provide the password to the user (e.g. by phone, e-mail, etc.). Since the administrator sets an initial password, the user is required to change the password on the next login.
The password change is also possible through a client application with the proper permissions. Here the logic to handle the password change safely is completely up to the client application.
Change password link
The easiest way to provide a password change functionality which is not part of the login process, is to present the user with a link to change the password.
The password change link is defined as follows:
https://<ProAuthBaseUrl>/UserStore/ChangePassword?loginName=<UserStoreUserLoginName>&tenantid=<TenantId>&idpinstanceid=<IdpInstanceId>
In addition to the required query parameters, the following optional query parameters can be added:
clientId
The id of the client app. This information will be used to find the proper view customization if the views are customized for a specific client application
changePwReturnUrl
If the password change has been successful, a confirmation page will be shown. If the
changePwReturnUrlis provided, the user will be redirected to this URL without showing a confirmation page.
To simplify the usage of the password change links, the claim engine can be used to add a new claim for the identity token which contains the password change link. The claim engine rule definition is as follows:
RuleType
Create
Type Transformation Replacement
i.e. pwchangeurl
Value Transformation Replacement
{% if Context.IsUserStoreLogin %}https://{{ Context.Host }}/UserStore/ChangePassword?loginName={{ Context.LoginName }}&tenantid={{ Context.TenantId }}&idpinstanceid={{ Context.IdpInstanceId }}&clientid={{ Context.ClientAppId }}{% endif %}
Brute Force Protection
ProAuth provides comprehensive brute force protection for UserStore authentication. Three independent mechanisms can be configured to protect user accounts from unauthorized access attempts: permanent account locking, temporary account locking, and progressive login throttling. Each mechanism is configured per UserStore IDP instance and can be enabled independently or combined for a layered defense.
Permanent Account Locking
When enabled, a user account is permanently locked after a configured number of consecutive failed login attempts. A locked account must be unlocked manually by an administrator through the Admin UI, the Management API, or the UserStore API.
A successful login resets the failed attempt counter to zero.
Configuration
| Option | Description | Default |
|---|---|---|
AttemptsBeforeUserLocked | Maximum number of consecutive failed login attempts before the account is permanently locked. Set to 0 or leave empty to disable permanent locking. | disabled |
TIP
Permanent locking is well suited for high-security environments. Combine it with the user lock notification (see User lock notifications) to alert administrators when an account is locked so they can take immediate action.
WARNING
If permanent locking is the only mechanism enabled, an attacker can deliberately lock out legitimate users by repeatedly submitting wrong passwords. Consider enabling temporary locking or throttling in addition.
Temporary Account Locking
Temporary locking automatically locks a user account for a configurable duration after a number of consecutive failed login attempts. Once the lock duration expires, the user can attempt to log in again. This protects accounts without requiring administrator intervention.
While a temporary lock is active, all login attempts are rejected — even if the correct password is provided. The failed attempt counter is not incremented during the lock period.
Configuration
| Option | Description | Default |
|---|---|---|
TemporaryLockEnabled | Enable or disable temporary account locking. | false |
TemporaryLockThreshold | Number of consecutive failed login attempts before a temporary lock is applied. | 5 |
TemporaryLockDurationSeconds | Duration of the temporary lock in seconds. After this period, the account is automatically unlocked. | 3600 (1 hour) |
INFO
Temporary locking and permanent locking use the same failed attempt counter but operate independently. If both are enabled, make sure the permanent lock threshold is higher than the temporary lock threshold. Otherwise the account will be permanently locked before a temporary lock can take effect.
Example
With TemporaryLockThreshold = 3 and TemporaryLockDurationSeconds = 600:
- The user fails 3 consecutive login attempts.
- The account is temporarily locked for 10 minutes.
- After 10 minutes, the user can attempt to log in again.
- If the user then enters the correct password, the counter resets and the lock is cleared.
Progressive Login Throttling
Throttling introduces an artificial, progressively increasing delay before each login response. The delay grows exponentially with the number of consecutive failed attempts, making automated brute force attacks impractical while keeping the impact on legitimate users minimal.
Configuration
| Option | Description | Default |
|---|---|---|
ThrottlingEnabled | Enable or disable progressive login throttling. | false |
ThrottlingBaseDelayMs | Base delay in milliseconds applied after the first failed login attempt. | 1000 |
ThrottlingMaxDelayMs | Maximum delay cap in milliseconds. The delay will never exceed this value. | 30000 |
Delay Formula
The delay for each failed attempt is calculated using exponential backoff:
$$\text{delay} = \min!\bigl(\text{BaseDelayMs} \times 2^{(\text{failedAttempts} - 1)},; \text{MaxDelayMs}\bigr)$$
A successful login resets the failed attempt counter and the delay returns to zero.
Example Delay Progression
With ThrottlingBaseDelayMs = 1000 and ThrottlingMaxDelayMs = 30000:
| Failed Attempts | Delay |
|---|---|
| 1 | 1,000 ms (1 s) |
| 2 | 2,000 ms (2 s) |
| 3 | 4,000 ms (4 s) |
| 4 | 8,000 ms (8 s) |
| 5 | 16,000 ms (16 s) |
| 6+ | 30,000 ms (30 s, capped) |
TIP
Throttling is the least disruptive protection mechanism. It does not prevent correct passwords from succeeding, it only adds a delay. This makes it a good default choice that can be combined with the other mechanisms.
Combining Mechanisms
All three protection mechanisms can be enabled at the same time for defense in depth. They are evaluated in the following order:
- Temporary lock — if active, the request is rejected immediately without checking credentials.
- Throttling — an artificial delay is applied before the credential check.
- Credential check — password validation is performed.
- Counter update — on failure, the failed attempt counter increments.
- Lock evaluation — permanent and temporary lock thresholds are evaluated against the updated counter.
Recommended Configuration for Combined Use
When using all three mechanisms together, configure the thresholds so they take effect in the desired order:
| Mechanism | Recommended Threshold |
|---|---|
| Throttling | enabled (base: 1000 ms, max: 30000 ms) |
| Temporary Lock | threshold: 5 attempts, duration: 300 seconds |
| Permanent Lock | threshold: 10 attempts |
This ensures:
- Attempts 1–4: progressively increasing delays slow down attackers
- Attempt 5: temporary lock engages, blocking all attempts for 5 minutes
- After unlock: if the user continues to fail, delays resume
- Attempt 10: permanent lock engages, requiring admin intervention
INFO
The failed attempt counter is shared across all three mechanisms. A successful login at any point resets the counter and clears any active temporary lock.
Lock Message Behavior
By default, when a user submits the correct password while the account is locked, ProAuth shows a specific error message indicating the lock state ("This account is locked out." for permanent locks, "This account is temporarily locked. Please try again later." for temporary locks). When the password is wrong, a generic "Invalid username or password." message is always returned regardless of the lock state.
In penetration-tested or high-security environments, showing a specific lock message after a correct password can be considered a side-channel — it reveals that the attacker guessed the correct password. To mitigate this, the InformAboutLockAfterSuccessfulLogin option can be set to false. When disabled, ProAuth returns the generic error message for both correct and incorrect passwords while the account is locked.
| Option | Description | Default |
|---|---|---|
InformAboutLockAfterSuccessfulLogin | When true, shows specific lock messages after a successful credential check on a locked account. When false, returns the generic "Invalid username or password" message in all cases. | true |
TIP
For internal or enterprise deployments where users need to understand why they cannot log in, keep the default (true). For public-facing or pentest-hardened deployments, set this option to false.
Configuration via Management API
Brute force protection options are configured as UserStore IDP instance options through the Management API. Options are set per IDP instance using the standard option endpoint:
http
PUT /api/v1/options
Content-Type: application/json

{
  "name": "ThrottlingEnabled",
  "value": "true",
  "applyToIdpInstanceId": "<idp-instance-id>"
}
All brute force protection options follow the same pattern. Replace name and value accordingly:
| Option Name | Type | Example Value |
|---|---|---|
AttemptsBeforeUserLocked | integer | 10 |
TemporaryLockEnabled | boolean | true |
TemporaryLockThreshold | integer | 5 |
TemporaryLockDurationSeconds | integer | 3600 |
ThrottlingEnabled | boolean | true |
ThrottlingBaseDelayMs | integer | 1000 |
ThrottlingMaxDelayMs | integer | 30000 |
InformAboutLockAfterSuccessfulLogin | boolean | true |
Infrastructure Rate Limiting
ProAuth's brute force protection operates at the application level and tracks failed attempts per user account. This is the primary security mechanism and should always be enabled.
Infrastructure-level rate limiting at your reverse proxy or load balancer provides an additional layer for protecting system resources:
Why Per-User Protection is Primary
ProAuth tracks failed attempts per username, not per IP or session:
- Protection applies regardless of the client's network origin
- Effective for users behind shared IPs (corporate NAT, VPNs, mobile carriers)
- Consistent enforcement across load-balanced deployments
Infrastructure rate limiting complements this by protecting system resources (CPU, connections, bandwidth) from high-volume attacks.
Recommended Infrastructure Measures
| Layer | Mechanism | Purpose |
|---|---|---|
| CDN / WAF | IP reputation and anomaly detection | Block known malicious sources |
| Reverse Proxy | Connection rate limiting | Prevent resource exhaustion |
| Load Balancer | Connection limits | Protect backend capacity |
Example: NGINX Rate Limiting
nginx
http {
    limit_req_zone $binary_remote_addr zone=login:10m rate=10r/s;

    server {
        location /signin {
            limit_req zone=login burst=20 nodelay;
            proxy_pass http://proauth;
        }
    }
}
TIP
Infrastructure rate limiting protects system resources. ProAuth's per-user mechanisms protect individual accounts. Enable both for defense in depth.
Best Practices
Defense in Depth
Brute force protection is one layer of a comprehensive authentication security strategy. For robust protection, combine it with:
| Measure | Purpose |
|---|---|
| Strong password policies | Reduce effectiveness of dictionary attacks |
| Multi-factor authentication | Require additional verification beyond passwords |
| Password breach detection | Prevent use of compromised credentials |
| Security monitoring (SIEM) | Detect and respond to attack patterns |
Recommended Configuration
For most deployments, enable all three mechanisms with the following configuration:
| Option | Recommended Value | Rationale |
|---|---|---|
ThrottlingEnabled | true | Low-impact baseline protection |
ThrottlingBaseDelayMs | 1000 | Noticeable delay without impacting legitimate users |
ThrottlingMaxDelayMs | 30000 | Caps delay at 30 seconds |
TemporaryLockEnabled | true | Auto-recovers without admin intervention |
TemporaryLockThreshold | 5 to 10 | Balance between security and usability |
TemporaryLockDurationSeconds | 300 to 900 | 5–15 minutes deters automated attacks |
AttemptsBeforeUserLocked | 15 to 20 (or disabled) | Only for high-security environments |
InformAboutLockAfterSuccessfulLogin | false | Recommended for public-facing deployments |
High-Security Environments
For deployments requiring stricter controls:
- Enable permanent locking with administrator notification
- Set
InformAboutLockAfterSuccessfulLogintofalse - Require multi-factor authentication for all users
- Integrate with a SIEM for real-time alerting
- Enable CAPTCHA protection for public-facing login pages
Distributed Deployments
ProAuth stores protection state in the database, ensuring consistent enforcement across all instances in a load-balanced deployment. No additional configuration is required for clustered environments.
Monitoring and Alerting
ProAuth exposes OpenTelemetry metrics for security events:
| Metric | Description |
|---|---|
userstore_temporary_lock_total | Temporary locks applied |
userstore_permanent_lock_total | Permanent locks applied |
Configure alerts for elevated lock rates, which may indicate an attack in progress or misconfigured thresholds affecting legitimate users.
Configure your monitoring system (Prometheus, Azure Monitor, Datadog, etc.) to alert on:
- Sudden spikes in lock events (possible attack in progress)
- Sustained elevated lock rates (credential stuffing campaign)
- Locks on privileged accounts (admin, service accounts)
CAPTCHA Protection
In addition to throttling and locking, ProAuth supports CAPTCHA challenges to distinguish human users from automated bots. CAPTCHA provides an additional layer of protection against credential stuffing and brute force attacks, particularly effective for public-facing login pages.
Supported Providers
ProAuth integrates with three privacy-focused CAPTCHA providers. All providers are GDPR-compliant and do not use invasive tracking.
| Provider | Description | Documentation |
|---|---|---|
| Cloudflare Turnstile | Free, privacy-focused, invisible challenges. Default provider. | developers.cloudflare.com/turnstile |
| hCaptcha | Privacy-focused alternative to reCAPTCHA, supports accessibility. | docs.hcaptcha.com |
| Friendly Captcha | EU-based, proof-of-work based, no cookies required. | docs.friendlycaptcha.com |
Recommended Provider
Cloudflare Turnstile is the recommended CAPTCHA provider. It is free, fully compatible with ProAuth's default security headers, and requires no additional configuration beyond the site key and secret key.
Cross-Origin-Embedder-Policy Override Required
hCaptcha and Friendly Captcha require cross-origin resources that are blocked by ProAuth's default Cross-Origin-Embedder-Policy: require-corp header. To use these providers, set the CrossOriginEmbedderPolicy base service setting to UnsafeNone:
json
"BaseServiceSettings": {
  "CrossOriginEmbedderPolicy": "UnsafeNone"
}
Or via Helm values:
yaml
appsettings:
  baseservicesettings:
    crossoriginembedderpolicy: "UnsafeNone"
This relaxation is safe because ProAuth applies other security headers (Content-Security-Policy, X-Frame-Options, Cross-Origin-Opener-Policy, Cross-Origin-Resource-Policy) that prevent framing and cross-origin attacks. The strict require-corp default is retained because it provides defense-in-depth for deployments that use Turnstile or do not use CAPTCHA.
INFO
Google reCAPTCHA is intentionally not supported due to privacy concerns. The supported providers offer comparable bot detection while respecting user privacy.
Activation Modes
CAPTCHA can be configured with three activation modes to balance security and user experience:
| Mode | Description |
|---|---|
Disabled | CAPTCHA is never shown. This is the default. |
Always | CAPTCHA is required on every login attempt. |
AfterFailures | CAPTCHA is required only after a configured number of consecutive failed login attempts. |
The AfterFailures mode provides a good balance — legitimate users entering correct credentials are not challenged, while repeated failures trigger CAPTCHA to stop automated attacks.
Configuration
CAPTCHA is configured per UserStore IDP instance. You must first register with your chosen CAPTCHA provider to obtain a site key and secret key.
| Option | Description | Default |
|---|---|---|
CaptchaActivationMode | When CAPTCHA is required: Disabled, Always, or AfterFailures. | Disabled |
CaptchaFailureThreshold | Number of consecutive failed login attempts before CAPTCHA is required (only applies when mode is AfterFailures). | 3 |
CaptchaProvider | CAPTCHA provider to use: Turnstile, HCaptcha, or FriendlyCaptcha. | Turnstile |
CaptchaSiteKey | Public site key from your CAPTCHA provider. Displayed in the browser. | — |
CaptchaSecretKey | Secret key for server-side verification. Keep this confidential. | — |
Configuration via Management API
CAPTCHA options are configured as UserStore IDP instance options through the Management API:
http
PUT /api/v1/options
Content-Type: application/json

{
  "name": "CaptchaActivationMode",
  "value": "AfterFailures",
  "applyToIdpInstanceId": "<idp-instance-id>"
}
Configure all required options:
| Option Name | Type | Example Value |
|---|---|---|
CaptchaActivationMode | string | AfterFailures |
CaptchaFailureThreshold | integer | 3 |
CaptchaProvider | string | Turnstile |
CaptchaSiteKey | string | 0x4AAA... |
CaptchaSecretKey | string | 0x4AAA... |
WARNING
The CaptchaSecretKey is sensitive and must be kept confidential. Store it securely and avoid logging or exposing it in client-side code.
Provider Setup
Cloudflare Turnstile
- Sign up at dash.cloudflare.com and navigate to Turnstile
- Add a new site and configure your domain
- Choose widget mode: Managed (recommended), Non-interactive, or Invisible
- Copy the Site Key and Secret Key to ProAuth configuration
hCaptcha
- Sign up at dashboard.hcaptcha.com
- Add a new site and configure your domain
- Copy the Site Key and Secret Key to ProAuth configuration
- Optionally enable Enterprise features for passive detection
Friendly Captcha
- Sign up at friendlycaptcha.com
- Create an application and configure your domain
- Copy the Site Key and API Key to ProAuth configuration
Integration with Other Protections
CAPTCHA operates alongside the other brute force protection mechanisms. The evaluation order is:
- Temporary lock — if active, reject immediately
- CAPTCHA — if required based on activation mode, verify challenge
- Throttling — apply progressive delay
- Credential check — validate password
- Counter update and lock evaluation — update failed attempts, check lock thresholds
TIP
For maximum protection, enable CAPTCHA in AfterFailures mode (threshold 2–3) combined with throttling and temporary locking. This provides layered defense: CAPTCHA stops bots, throttling slows attackers, and locking halts persistent attacks.
Recommended Configuration
| Scenario | CaptchaActivationMode | CaptchaFailureThreshold |
|---|---|---|
| Internal enterprise application | Disabled | — |
| Public-facing application | AfterFailures | 3 |
| High-security or under attack | Always | — |
INFO
The AfterFailures mode tracks failed attempts per user account. An attacker targeting multiple accounts will trigger CAPTCHA on each account individually after the threshold is reached.