Appearance
Federated Identity Providers
Generic OIDC
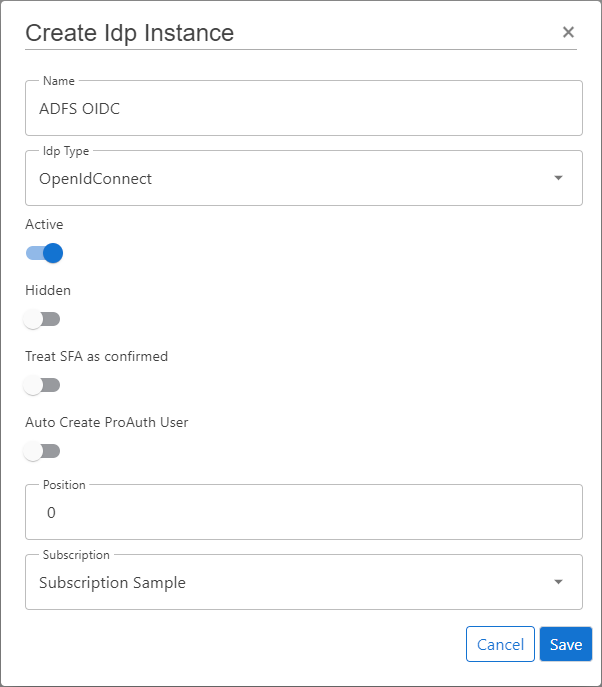
Create new IDP
Steps to create a new IDP:
- Navigate to the ProAuth Admin UI and login with a user assigned to role
SubscriptionAdminor higher - Navigate to
Idp Instancesand click onCreate Idp Instance - Choose the IDP Type
OpenIdConnect - Enable the flag
Active - Enable the flag
Auto Create ProAuth User- Disable this flag when you want to synchronize the ProAuth users by SCIM
- Choose the proper Subscription
- Click
Save
WARNING
DON'T enable Auto Create ProAuth User when this IDP is synchronized by SCIM
When this IDP is linked to an Azure AD or Windows AD and the users are synchronized automatically by SCIM, this option should be disabled to deny new not existing ProAuth users to process a login
Configure new IDP
After the creation of the IDP in the step before, it's now necessary to configure the IDP. Invalid IPDs aren't available in ProAuth.
Once the ClientApp from the external IDP is created, all necessary information are available to create the IDP in ProAuth.
Steps to complete the configuration of the IDP:
- Open the IDP in the extended edit view
- Assign the IDP to the required Tenants
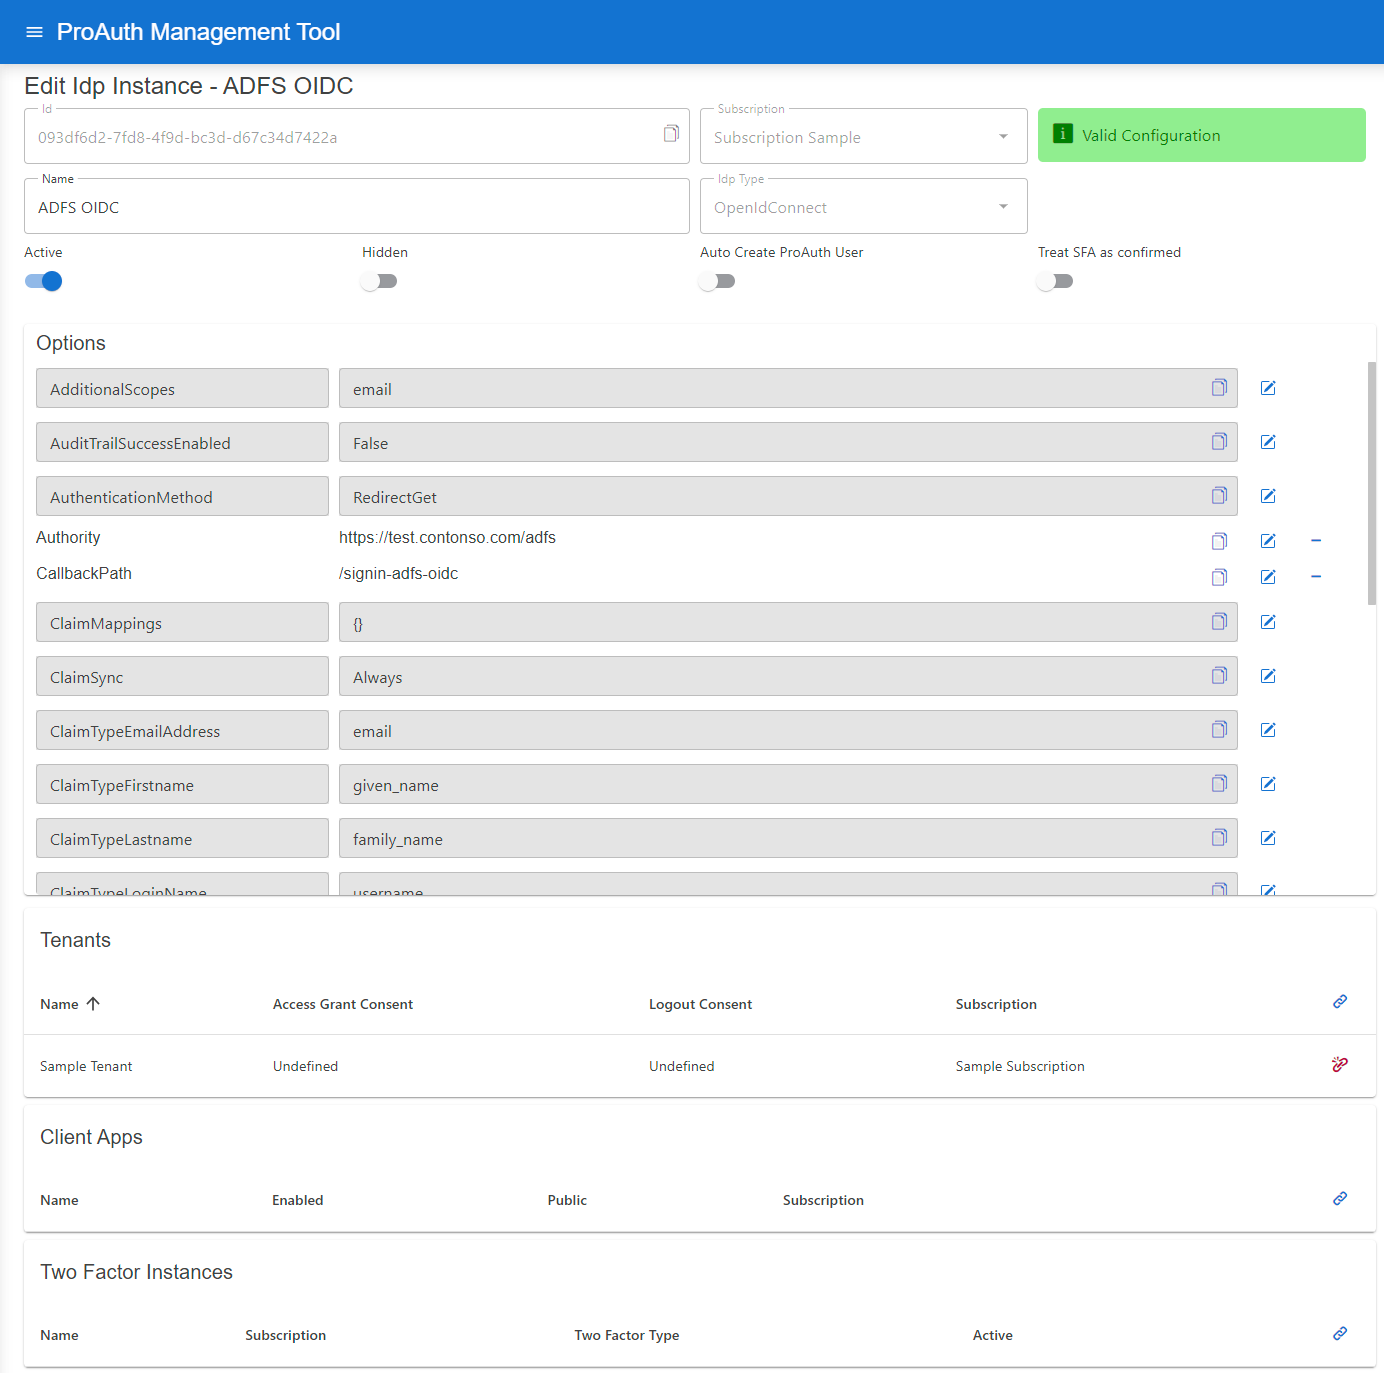
Configure mandatory Options:
- Set the
Authority - Set the
CallbackPathwhich we already used in the ClientApp creation - Set the
ClientIdwhich we get in the ClientApp creation - Set the
ClientSecretwhich we get in the ClientApp creation
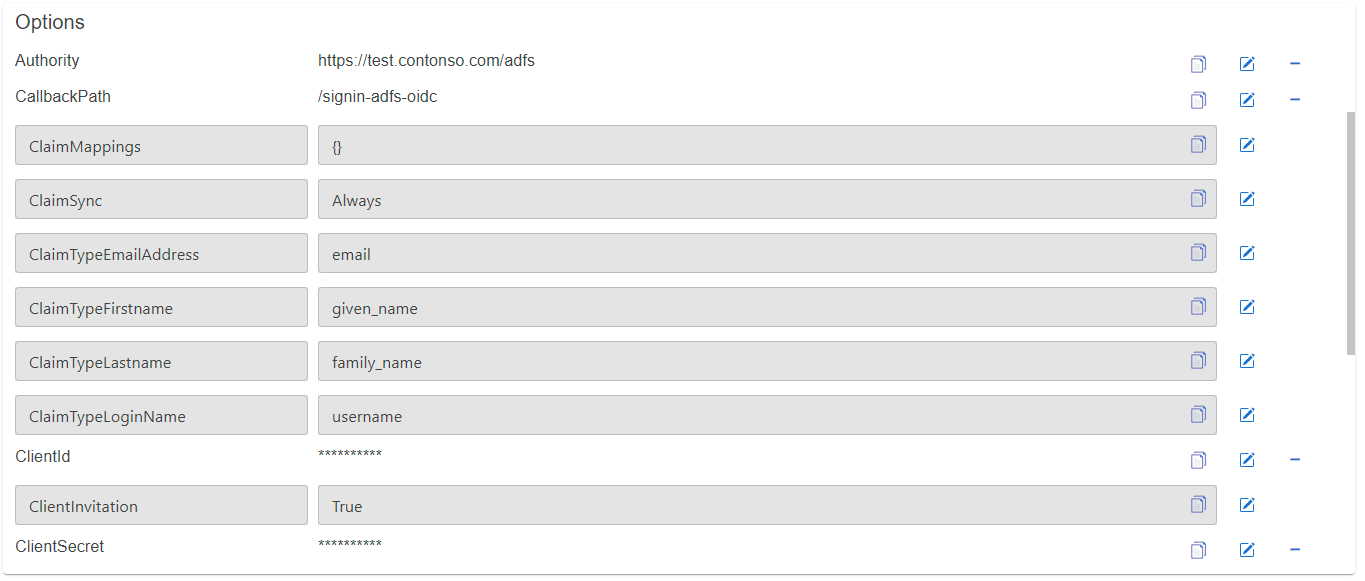
Request resources or scopes:
- Set the
RequestResourcesoption to request specific resources (multiple resources separated by spaces)

- Set the
AdditionalScopesoption to request additional scopes (multiple scopes separated by spaces), default scopes for OIDCopenid profileare always applied

Azure Active Directory OIDC
Create new IDP
Setup a generic OIDC IPD as described in the corresponding chapter.
Preparing Azure AD
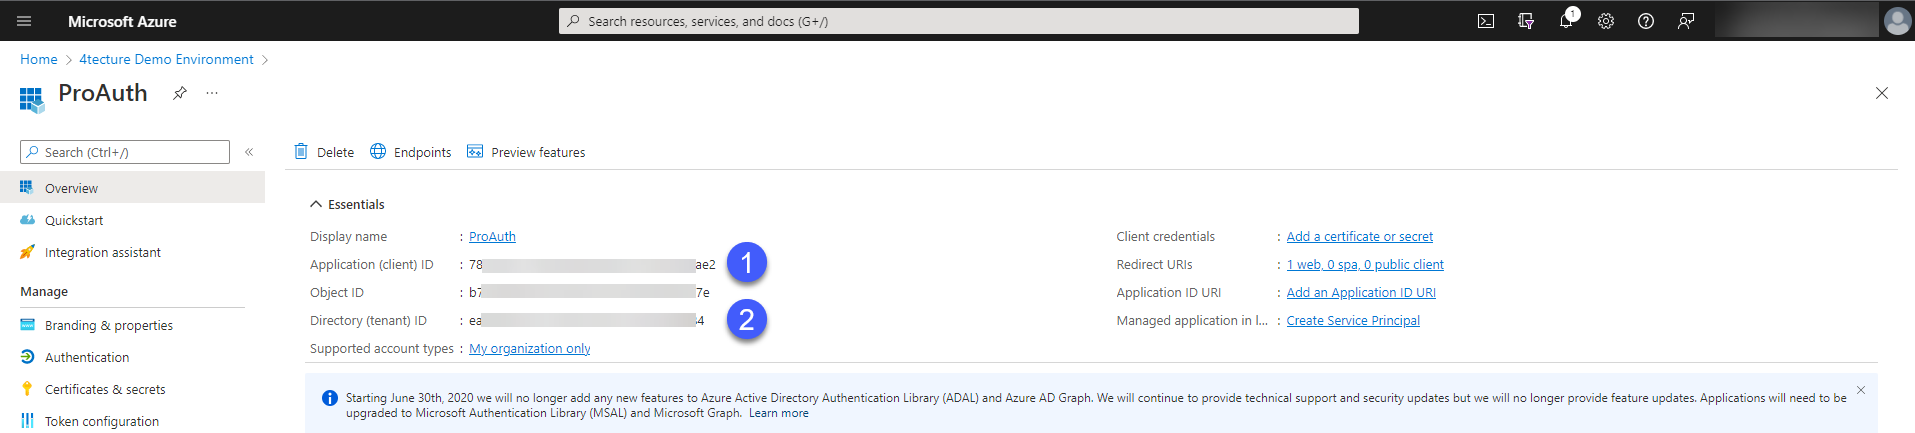
In order to federate the authentication with Azure AD, an App registration needs to be created in the Azure Active Directory.
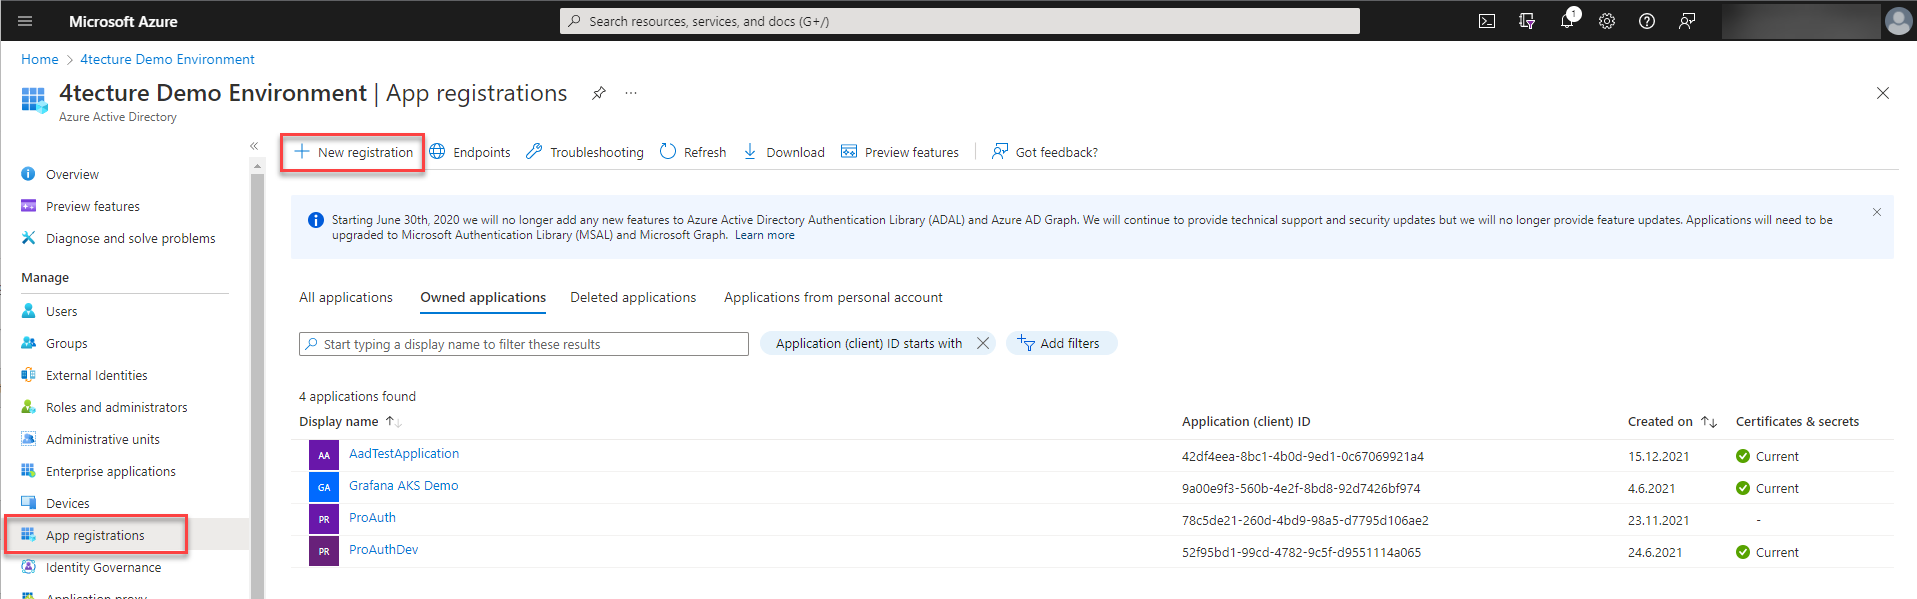
To configure the IDP instance in ProAuth, we need a couple of configuration items.
- Client Id
- Tenant Id
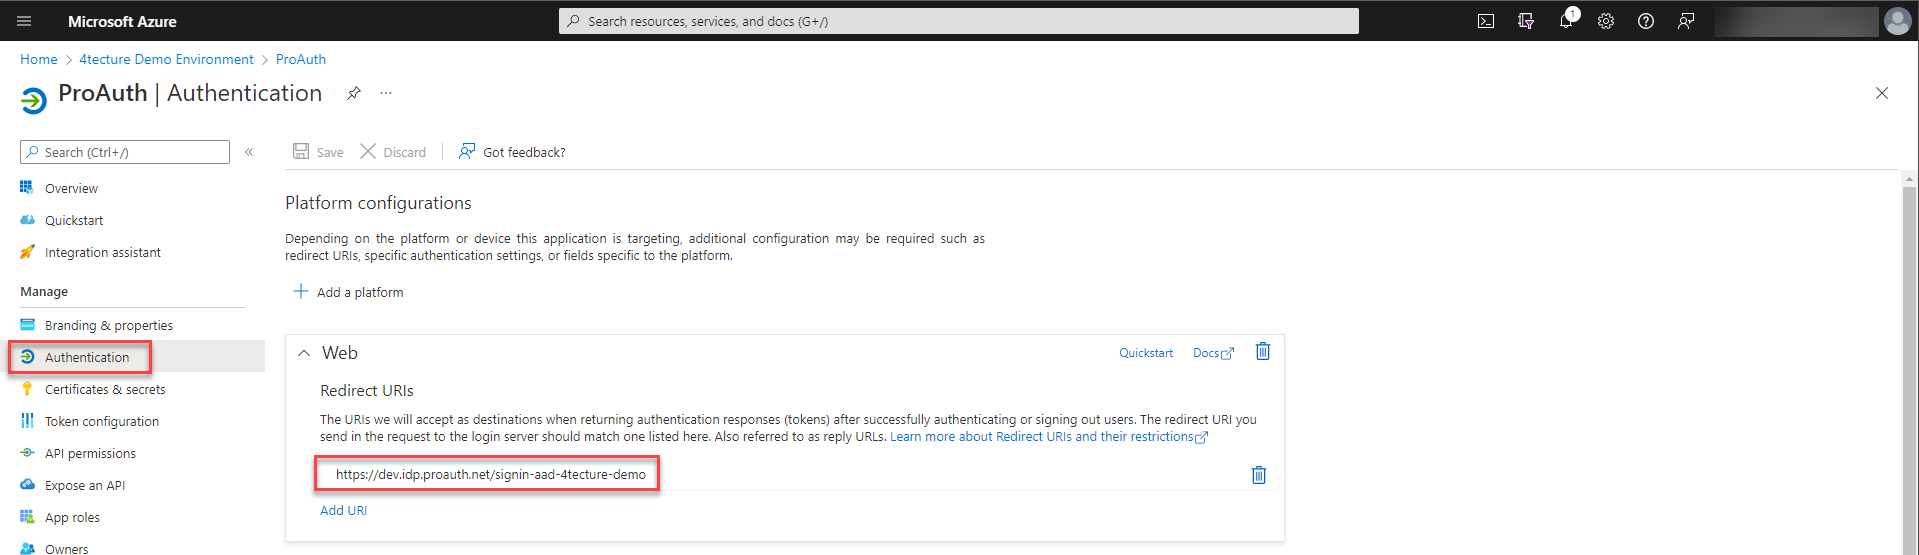
Furthermore, we need to set the return URL to ProAuth. The return URL suffix is defined in the IDP instance options and needs to be entered as a fully qualified domain here.
To complete the required settings, we need to create a client secret. Please make sure you copy the secret value before closing the dialog, because you do not have access to it afterwards.

Configure new IDP
Configure a new created generic OIDC IPD as described in the corresponding chapter.
The setting values we created in the prior step need to be configured in the IPD instance options.
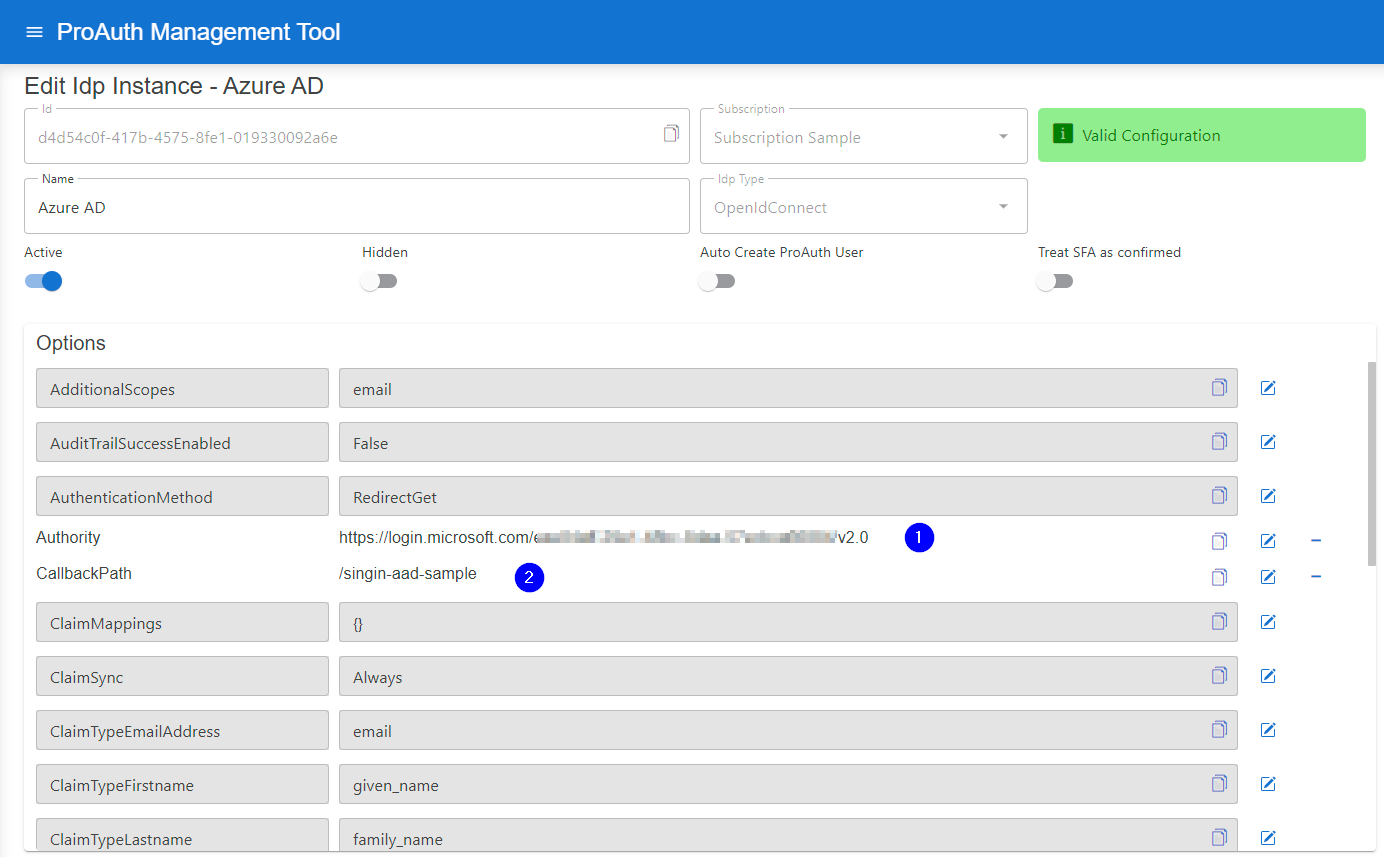
- Set the Authority URL by using the tenant id with the following pattern:
https://login.microsoftonline.com/<tenantid>/v2.0 - Set the callback postfix which was used as part of the return URL.
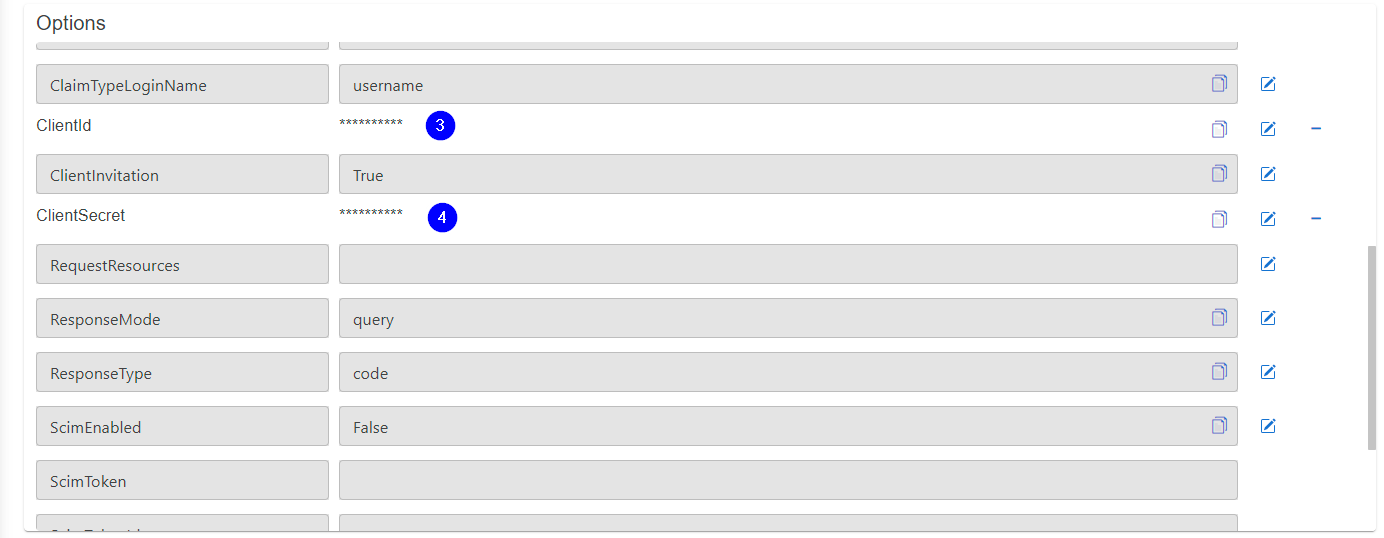
- Copy paste the client id.
- Copy paste the client secret.
Active Directory Federation Services OIDC
Create new IDP
Setup a generic OIDC IPD as described in the corresponding chapter.
Configure new IDP
Create a ADFS client application to obtain the required options to configure the OIDC IDP.
- Authority:
https://<adfs-cert-uri>/adfs - Client Identifier (
ClientId) - Client Secret (
ClientSecret)
Configure a new created generic OIDC IPD as described in the corresponding chapter.
Setup an ADFS client app for IDP
To setup an IDP in ProAuth for ADFS OIDC, a client application is needed.
At the end of executing the client app wizard, you will have the options to configure the IPD Instance properly.
- Client Identifier (-> ClientId)
- Client Secret (-> ClientSecret)
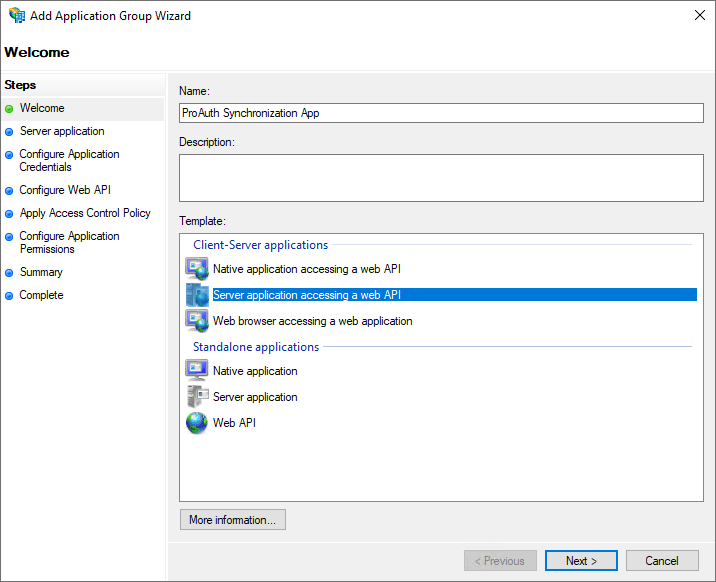
Steps to create a client app:
- Open
AD FS Management - Go to
Application Groupsand click onAdd Application Group
Wizard Page: Welcome
- Define a client app name
- Choose
Server application accessing a web API - Click
Next
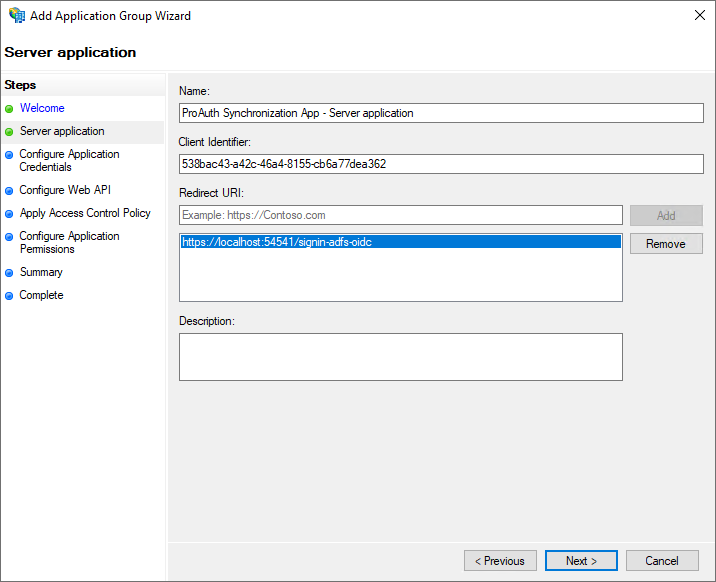
Wizard Page: Server application
- Copy the Client Identifier
- this is needed later on when configuring the ProAuth IDP
- Add a redirect URI to ProAuth with a unique suffix
- the suffix needs to be the same as in the IPD configured later on
- Click
Next
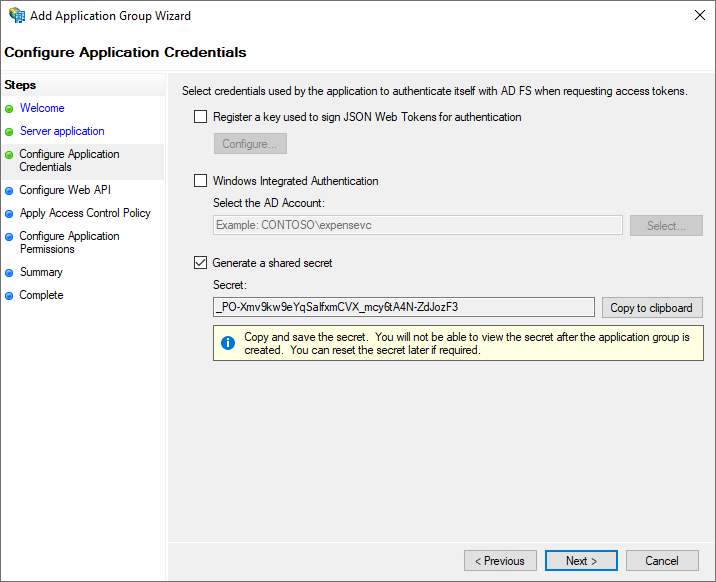
Wizard Page: Configure Application Credentials
- Check the option
Generate a shared secret - Copy the secret and put it to a secure place
- you will not be able to get that secret again, you need then to create a new one
- this is needed later on when configuring the ProAuth IDP
- Click
Next
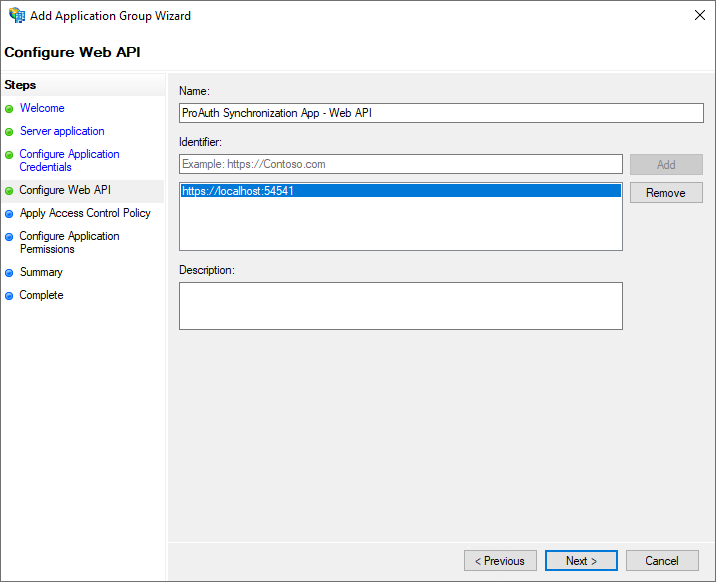
Wizard Page: Configure Web API
- Add the
Identifier - Click
Next
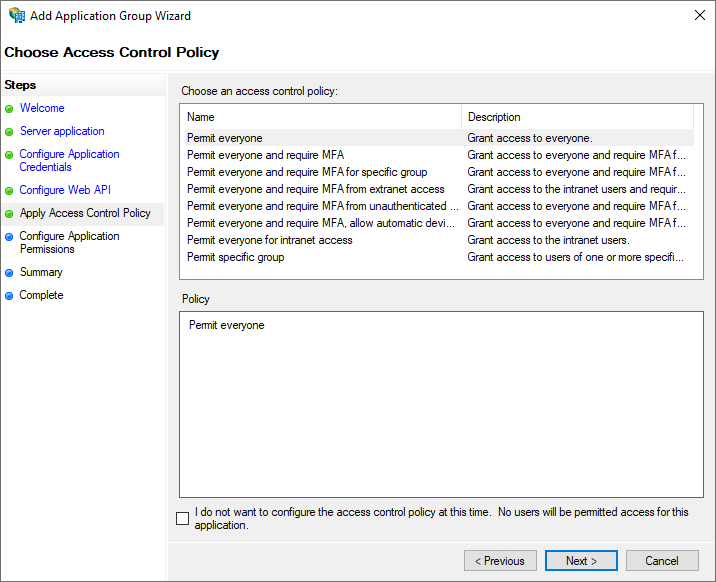
Wizard Page: Apply Access Control Policy
- Apply the proper access control policies
- Click
Next
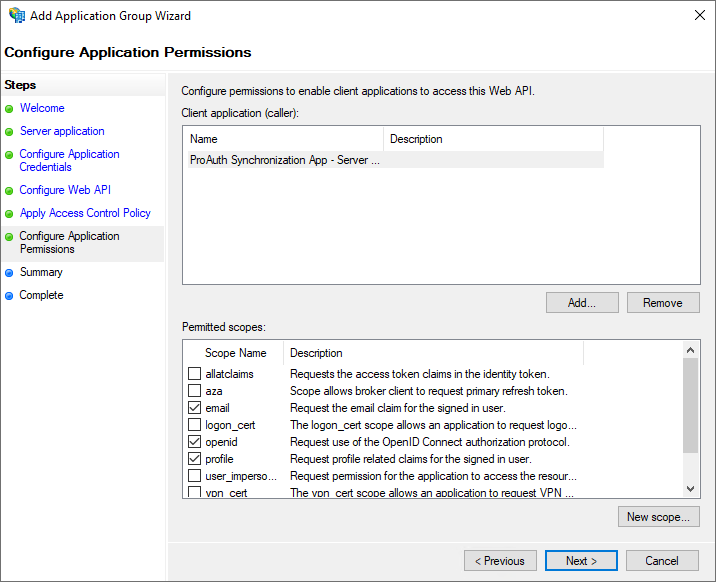
Wizard Page: Configure Application Permissions
- Choose the necessary application permitted scopes
- Click
Next
Wizard Pages: Summary, Complete
- Check the settings
- Click
Next - Click
Close
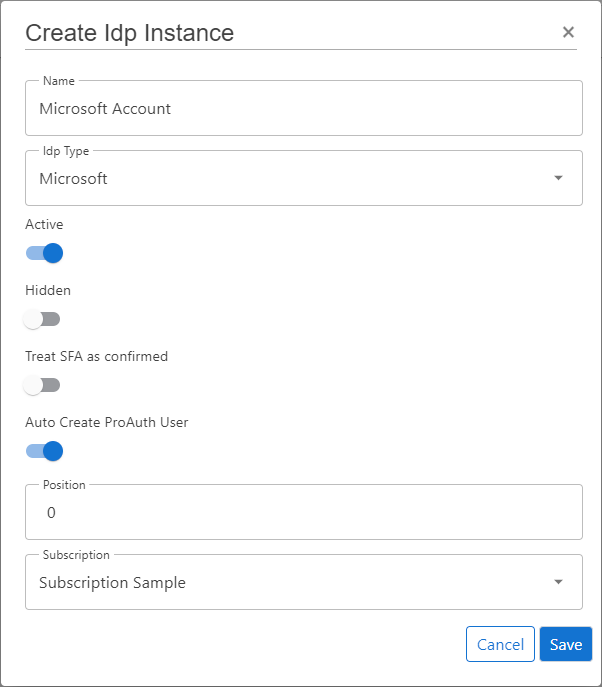
Microsoft Account
Create new IDP
Steps to create a new IDP:
- Navigate to the ProAuth Admin UI and login with a user with in minimum is a
SubscriptionAdmin - Navigate to
Idp Instancesand click onCreate Idp Instance - Choose the IDP Type
Microsoft - Enable the flag
Active - Enable the flag
Auto Create ProAuth User - Choose the proper Subscription
- Click
Save
Configure new IDP
After the creation of the IDP in the step before, it's now necessary to configure the IDP. Invalid IPDs aren't available in ProAuth.
Once the ClientApp from the external IDP is created, all necessary information are available to create the IDP in ProAuth.
Steps to complete the configuration of the IDP:
- Open the IDP in the extended edit view
- Assign the IDP to the required Tenants

Configure mandatory Options:
- Set the
CallbackPathwhich we already used in the ClientApp creation - Set the
ClientIdwhich we get in the ClientApp creation - Set the
ClientSecretwhich we get in the ClientApp creation

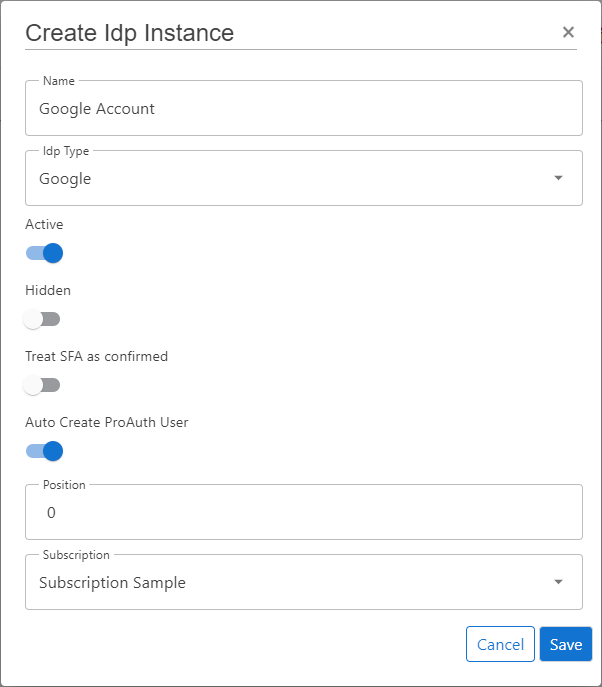
Google Account
Create new IDP
Steps to create a new IDP:
- Navigate to the ProAuth Admin UI and login with a user assigned to role
SubscriptionAdminor higher - Navigate to
Idp Instancesand click onCreate Idp Instance - Choose the IDP Type
Google - Enable the flag
Active - Enable the flag
Auto Create ProAuth User - Choose the proper Subscription
- Click
Save
Configure new IDP
After the creation of the IDP in the step before, it's now necessary to configure the IDP. Invalid IPDs aren't available in ProAuth.
Once the ClientApp from the external IDP is created, all necessary information are available to create the IDP in ProAuth.
Steps to complete the configuration of the IDP:
- Open the IDP in the extended edit view
- Assign the IDP to the required Tenants

Configure mandatory Options:
- Set the
CallbackPathwhich we already used in the ClientApp creation - Set the
ClientIdwhich we get in the ClientApp creation - Set the
ClientSecretwhich we get in the ClientApp creation

Twitter Account
Create new IDP
Steps to create a new IDP:
- Navigate to the ProAuth Admin UI and login with a user assigned to role
SubscriptionAdminor higher - Navigate to
Idp Instancesand click onCreate Idp Instance - Choose the IDP Type
Twitter - Enable the flag
Active - Enable the flag
Auto Create ProAuth User - Choose the proper Subscription
- Click
Save

Configure new IDP
After the creation of the IDP in the step before, it's now necessary to configure the IDP. Invalid IPDs aren't available in ProAuth.
Once the ClientApp from the external IDP is created, all necessary information are available to create the IDP in ProAuth.
Steps to complete the configuration of the IDP:
- Open the IDP in the extended edit view
- Assign the IDP to the required Tenants

Configure mandatory Options:
- Set the
CallbackPathwhich we already used in the ClientApp creation - Set the
ClientIdwhich we get in the ClientApp creation - Set the
ClientSecretwhich we get in the ClientApp creation

Facebook Account
Create new IDP
Steps to create a new IDP:
- Navigate to the ProAuth Admin UI and login with a user assigned to role
SubscriptionAdminor higher - Navigate to
Idp Instancesand click onCreate Idp Instance - Choose the IDP Type
Facebook - Enable the flag
Active - Enable the flag
Auto Create ProAuth User - Choose the proper Subscription
- Click
Save

Configure new IDP
After the creation of the IDP in the step before, it's now necessary to configure the IDP. Invalid IPDs aren't available in ProAuth.
Once the ClientApp from the external IDP is created, all necessary information are available to create the IDP in ProAuth.
Steps to complete the configuration of the IDP:
- Open the IDP in the extended edit view
- Assign the IDP to the required Tenants
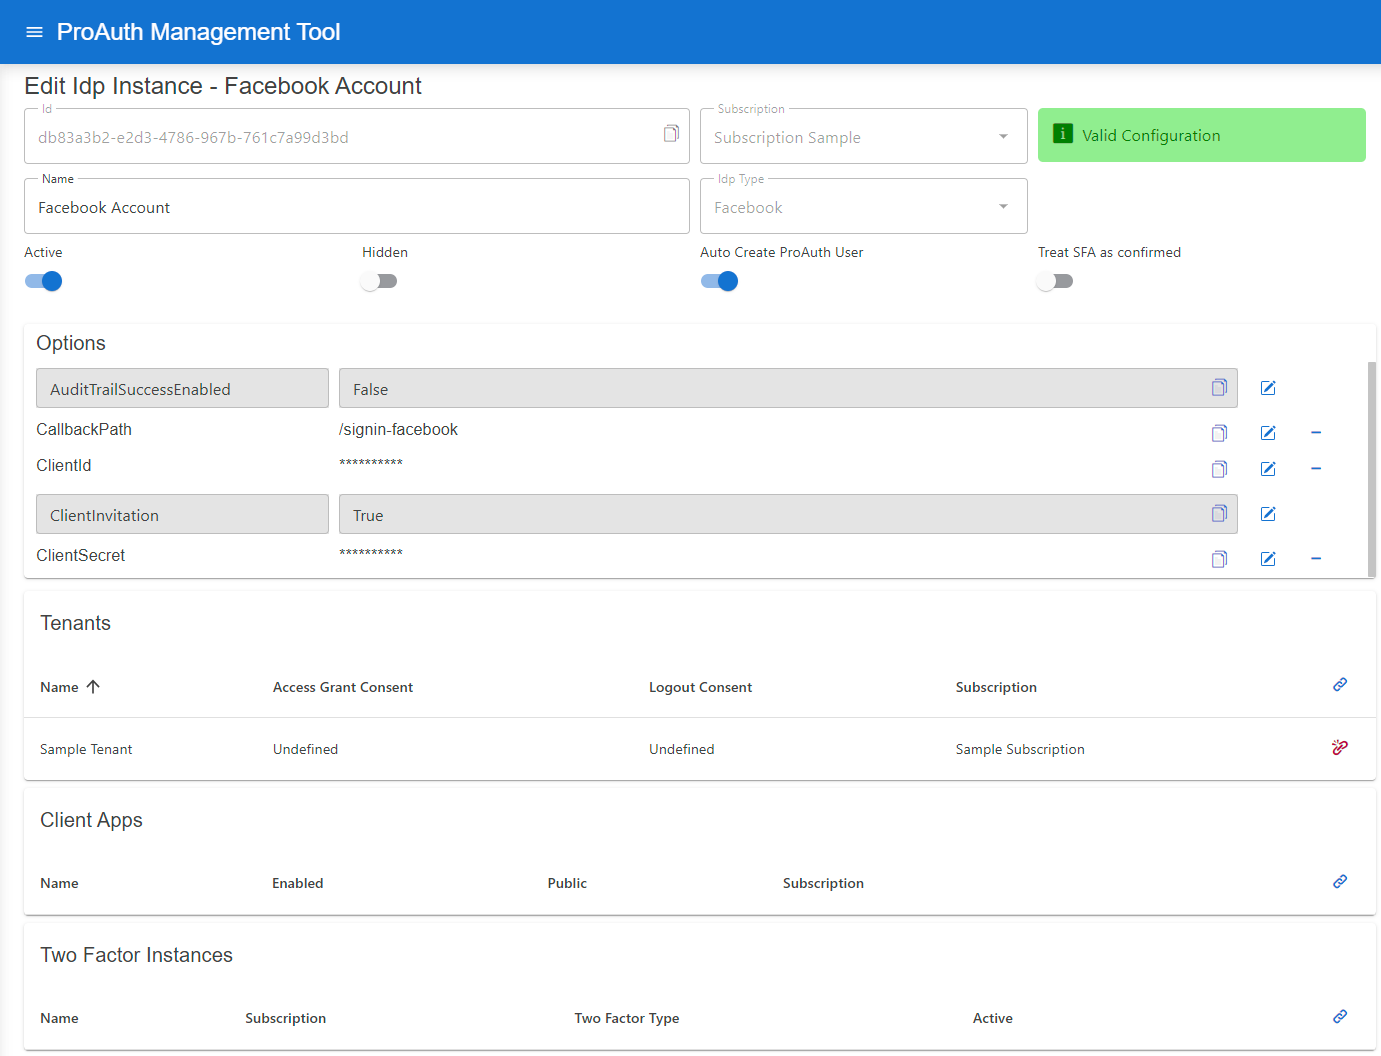
Configure mandatory Options:
- Set the
CallbackPathwhich we already used in the ClientApp creation - Set the
ClientIdwhich we get in the ClientApp creation - Set the
ClientSecretwhich we get in the ClientApp creation

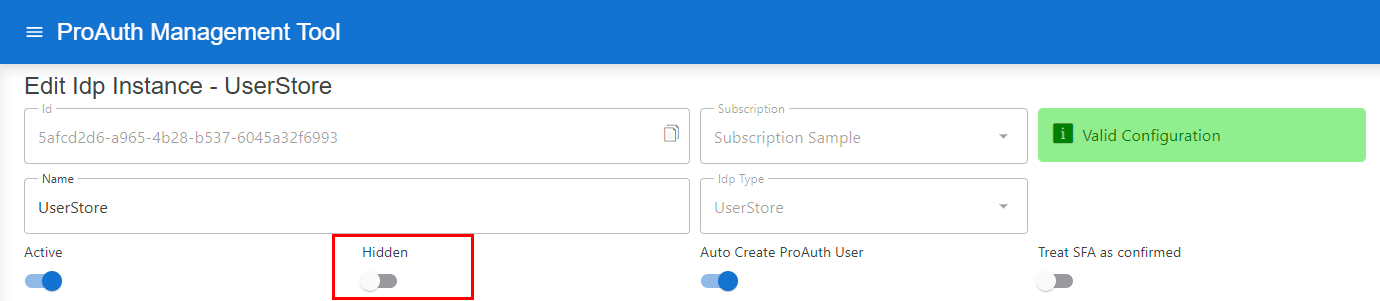
IDP selection filter
During an interactive authentication flow, the user is presented with all the available IDP instances for the current tenant if there is more than one configured. Sometimes there is a need to hide certain IDP instances (i.e. dedicated support login IDP instance).
Hidden IDP instances are not available for login. By using ACR parameters, hidden IDP instances can be made available or by using a filter a subset of IDP instances can be made available (hidden and not hidden instances). If the filter contains a single instance, the login is directly performed with that particular instance.
The following ACR values are available for this purpose (only one or the other can be used, not both).
- ACR value
idpfilterThe available IDP instances will be filtered according to the instances contained by this filter expression. The hidden flag is not taken into account, the IDPs in the filter are displayed in any case. If the filter contains only one instance, the login is directly performed with this particular instance.
acr_values=idpfilter:<idp-id1>,<idp-id2>,<idp-id3>,...
ACR value
hiddenidpfilterThis filter expression only filters hidden instances which means that they will be available for selection by the user. However, the not-hidden instances are shown anyway and are therefore not touched by this filter expression. If no values are given to the ACR value, all hidden IDP instances are displayed.acr_values=hiddenidpfilter:<hidden-idp-id1>,<hidden-idp-id2>,<hidden-idp-id3>,...
To set an IDP instance to hidden, set the Hidden flag on an IDP:
IDP Health Check
To check if an IDP is configured correctly and the data binding is valid, a health check is available on the IdpInstance API.
The response of the health request returns the following object HealthStatusIdpDto with this information:
InstanceId: The IDP instance ID.
HasConfigurationError: true if the IDP instance has configuration errors, otherwise false
IsOperational
- UserStore IDP:
trueif a database connection can be established and the DB schema check is successful, otherwisefalse - OpenID Connect IDP:
trueif the authority URL is valid and the OpenID Connect Configuration can be retrieved, otherwisefalse - all other IDP types (social IDPs, ...):
true, because no endpoint can be checked